nKast

pixel perf-ect

14. April 2014 03:19
by nKast
0 Comments

CPU Skinning: Go Native

14. April 2014 03:19 by nKast | 0 Comments

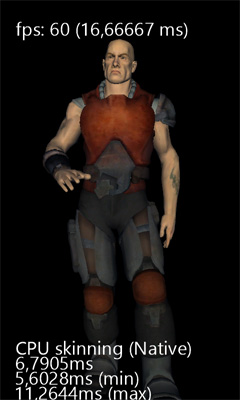
One of the cool things with WP8 was the ability to write native code, something that was missing from the previous platform. Skinning was the perfect testbed to test what native code could do. 

C++/CX

The way to add native code to WP8 is C++/CX, a new language extension that replaced the managed C++/CLI as a mean to mix C++ with C#. One drawback of C++/CX is that you can't pass pointers around so you have to copy structs defined in MonoGame like Vector3 & Matrix to equivalent C++ structs. For example here is a Matrix struct in C++/CX.

namespace NativeHelper 

{
    namespace Data
    {
        public value struct MatrixData
        {
        public:
            float M11, M12, M13, M14;
            float M21, M22, M23, M24;
            float M31, M32, M33, M34;
            float M41, M42, M43, M44;
        };
    }
}


Another drawback was that any parameter or array you pass to C++/CX is copied/marshaled. That meant that native code should be way faster that C# to counter any slowdown from all that data copied around. Extra care was taken to limit that to the minimum. 


First, I populated the native object with the cpuVertices on initialization. That way I only had to pass the new bones on every frame. 
Second, the returned skinned vertices can be used directly to update the dynamic vertex buffer. The fact that the vertex struct is defined in native code is irrelevant since public C++/CX struct are valid C# struct and VertexBuffer.SetData() accept either IVertexType or struct.

Another important detail was the type of parameters in C++/CX. The bones were declared const Array<MatrixData>^ which means that there is no need to copy the content back when the function returns and the skinned vertices were declared as WriteOnlyArray<VertexPositionNormalTextureData>^ which means that there is no need to copy it's content when you call the native code. It only copy/marshal the content back when the function returns.

void Skin(const Array<MatrixData>^ bones, WriteOnlyArray<VertexPositionNormalTextureData>^ vertices);

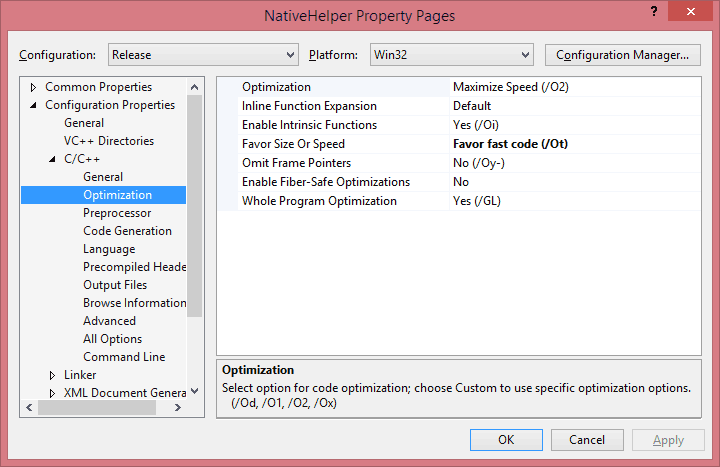
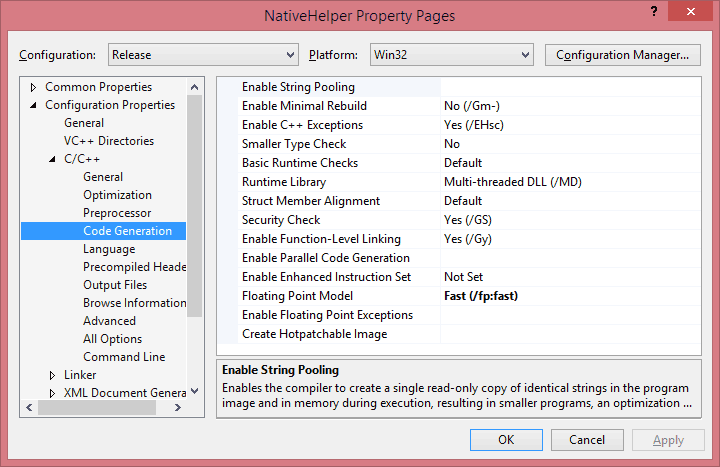
There are some more tricks to get the most out of C++. Disable all kinds of runtime checks in the project, Maximize Speed, Favor Fast Code (over size) and enable Fast Floating Point Model.

Finally, I found that accessing directly the Data pointer of the arrays was a bit faster than accessing them through the [] operator.

void NativeHelper::SkinnedModel::Skin(const Array<Matrix3x4Data>^ bones, Platform::WriteOnlyArray<VertexPositionNormalTextureData>^ vertices)
{  
    // copy data locally
    int bonesLength = bones->Length;
    Matrix3x4Data* locbones = bones->Data;
     
    VertexPositionNormalTextureData* vout = vertices->Data;
 
    // skin all of the vertices
    int icount = _verticesLength;
    for (int i = 0; i < icount; i++)
    {  
        int b0 = _skinVertices[i].BlendIndices.X;
        int b1 = _skinVertices[i].BlendIndices.Y;
        int b2 = _skinVertices[i].BlendIndices.Z;
        int b3 = _skinVertices[i].BlendIndices.W;
 
        Matrix3x4Data* m1 = &locbones[b0];
        Matrix3x4Data* m2 = &locbones[b1];
        Matrix3x4Data* m3 = &locbones[b2];
        Matrix3x4Data* m4 = &locbones[b3];
 
        float w1 = _skinVertices[i].BlendWeights.X;
        float w2 = _skinVertices[i].BlendWeights.Y;
        float w3 = _skinVertices[i].BlendWeights.Z;
        float w4 = _skinVertices[i].BlendWeights.W;
         
        Matrix3x4Data skinnedTransformSum;
        skinnedTransformSum.M11 = (m1->M11 * w1) + (m2->M11 * w2) + (m3->M11 * w3) + (m4->M11 * w4);
        skinnedTransformSum.M12 = (m1->M12 * w1) + (m2->M12 * w2) + (m3->M12 * w3) + (m4->M12 * w4);
        skinnedTransformSum.M13 = (m1->M13 * w1) + (m2->M13 * w2) + (m3->M13 * w3) + (m4->M13 * w4);
        skinnedTransformSum.M21 = (m1->M21 * w1) + (m2->M21 * w2) + (m3->M21 * w3) + (m4->M21 * w4);
        skinnedTransformSum.M22 = (m1->M22 * w1) + (m2->M22 * w2) + (m3->M22 * w3) + (m4->M22 * w4);
        skinnedTransformSum.M23 = (m1->M23 * w1) + (m2->M23 * w2) + (m3->M23 * w3) + (m4->M23 * w4);
        skinnedTransformSum.M31 = (m1->M31 * w1) + (m2->M31 * w2) + (m3->M31 * w3) + (m4->M31 * w4);
        skinnedTransformSum.M32 = (m1->M32 * w1) + (m2->M32 * w2) + (m3->M32 * w3) + (m4->M32 * w4);
        skinnedTransformSum.M33 = (m1->M33 * w1) + (m2->M33 * w2) + (m3->M33 * w3) + (m4->M33 * w4);
        skinnedTransformSum.M41 = (m1->M41 * w1) + (m2->M41 * w2) + (m3->M41 * w3) + (m4->M41 * w4);
        skinnedTransformSum.M42 = (m1->M42 * w1) + (m2->M42 * w2) + (m3->M42 * w3) + (m4->M42 * w4);
        skinnedTransformSum.M43 = (m1->M43 * w1) + (m2->M43 * w2) + (m3->M43 * w3) + (m4->M43 * w4);
         
        // Support the 4 Bone Influences - Position then Normal
        Vector3Data position = _skinVertices[i].Position;
        vout[i].Position.X = position.X * skinnedTransformSum.M11 + position.Y * skinnedTransformSum.M21 + position.Z * skinnedTransformSum.M31 + skinnedTransformSum.M41;
        vout[i].Position.Y = position.X * skinnedTransformSum.M12 + position.Y * skinnedTransformSum.M22 + position.Z * skinnedTransformSum.M32 + skinnedTransformSum.M42;
        vout[i].Position.Z = position.X * skinnedTransformSum.M13 + position.Y * skinnedTransformSum.M23 + position.Z * skinnedTransformSum.M33 + skinnedTransformSum.M43;
        Vector3Data normal = _skinVertices[i].Normal;
        vout[i].Normal.X = normal.X * skinnedTransformSum.M11 + normal.Y * skinnedTransformSum.M21 + normal.Z * skinnedTransformSum.M31;
        vout[i].Normal.Y = normal.X * skinnedTransformSum.M12 + normal.Y * skinnedTransformSum.M22 + normal.Z * skinnedTransformSum.M32;
        vout[i].Normal.Z = normal.X * skinnedTransformSum.M13 + normal.Y * skinnedTransformSum.M23 + normal.Z * skinnedTransformSum.M33;
 
        vout[i].TextureCoordinate = _skinVertices[i].TextureCoordinate;
    }
     
    return;
}


Overall, here are the results: 

Device Original Native Native(Parallelization)
L 620 11,769ms 5,875ms 4,475ms


From 11,77ms it goes down to 5.87ms just by moving the code to C++, including the extra copy, cost of crossing the ABI from managed to native, etc. That is down to 50% of the original code = Twice as fast!


Auto-Parallelization

Another cool feature of VC+ compiler+ is Auto-Parallelization and Auto-VectorizationVectorization uses SIMD instructions when possible. It works only with basic value types like floats. It didn't like structs or pointers, but to be fair I didn't spend much time on it, nor did I try it on VS2015. All those are tests I done more than a year ago on VS2013.
Parallelization on the other hand was relatively easy to achieve. Parallelization uses multiple cores to run a loop in parallel. In the case of Lumia 620, it uses 2 cores/threads. By using native code and enabling Parallelization the time drop down to 4,47ms. Unfortunately it's very unstable, every few seconds it can spikes up to 300ms which makes it unsuitable for games.


Code

 CPUSkinning - 03 - GoNative.zip (7.17 mb)


5. February 2014 03:20
by nKast
0 Comments

CPU Skinning: ARM-NEON

5. February 2014 03:20 by nKast | 0 Comments

 One of the nice things about Windows Phone 7 was the experimental support for ARM-NEON instructions. What it did, was generate NEON instructions for XNA's build in vector classes. It greatly improved performance on things like Physics, Particles, Geometry generation,etc. I used this from the very beginning on The Juggler to improve Farseer physics and later on Dr. Pickaxe to improve both Physics and CPU Skinning. In this forum @Moblunatic describes how you can modify the CPU Skinning sample to get a ~40% improvement on WP7 devices.

As we moved our next project to WP8/MonoGame I decided to do again some measurements to see if I could do any optimization.


Platform Device Original NEON
XNA HD7 (WP7.5)  28,412ms 18,463ms
 L 620 (WP8)   8,750ms  14,159ms
 MonoGame  L 620 (WP8) 11,769ms 25,639ms


The first thing we notice is that on WP8 we no longer get the benefit of ARM-NEON. Even on old XNA projects the OS no longer use them. So you need to detect WP8, probably by checking for it via reflection, and use the original skinning code if you want maximum performance. 
 The same is true for MonoGame. You should revert back to the original code if you need max performance.

Assume nothing

One of the things I notice about the code, was that it makes a method call inside the loop, which in turn calls a second method. 

// skin all of the vertices
for (int i = 0; i < vertexCount; i++)
{
        CpuSkinningHelpers.SkinVertex(
            bones,
            ref cpuVertices[i].Position,
            ref cpuVertices[i].Normal,
            ref cpuVertices[i].BlendIndices,
            ref cpuVertices[i].BlendWeights,
            out gpuVertices[i].Position,
            out gpuVertices[i].Normal);
}


 I assumed that I could speed up the code significantly by removing the overhead caused by those calls by bringing the actual code inside the loop. This turn out to work for the neon version but I also got some weird artifacts on HD7, so I couldn't use it. 
 For the original code, the one I use for MonoGame, it made things worst! It turns out the code is not written this way for simplicity but there are some very clever optimizations going on. 
 Notice the use ref & out? This is like taking the address of -let's say- cpuVertices[i].Position and passing it down to the next method instead copying the struct to a local variable or keep accessing it through the cpuVertices[i] list. Since some platforms don't allow pointers/unsafe code the use of ref/out is a nice trick!

Platform Device Original NEON Original(flat) NEON(flat)
XNA HD7 (WP7.5)  28,412ms 18,463ms  34,210ms 14,099ms
 L 620 (WP8)   8,750ms  14,159ms  9,421ms  9,7598ms
 MonoGame  L 620 (WP8) 11,769ms 25,639ms 12,758ms 21,035ms


Conclusion

 If you still support WP7 with XNA, always use CPU skinning (the GPUs were really weak) enable NEON (EnableFPIntrinsicsUsingSIMD inside AssemplyInfo.cs), and use the NEON version of CPUSkinning.

 For WP8 the GPU is fast enough to do skinning, but you can always use that extra headroom for rich shading/post-proccessing/etc. Skinning is one of few things that you can move to a second thread so it comes for free if you do so. Use the original skinning code which is better optimized and performs better in the absence of NEON/XNA.

Code

CPUSkinning - 02 - Neon.zip (10.99 mb)


2. February 2014 01:13
by nKast
0 Comments

CPU Skinning: Better Loading times

2. February 2014 01:13 by nKast | 0 Comments

One of the issues I had to resolve during the development of our next game was slow loading times on WP8. After some investigation I figure that about half of the time was spent on loading models with skinning information.

I use the code from the CPU Skinning sample. The sample demonstrate how to efficiently do animations on mobile devices which means all other aspects are left as simple as possible so you can adapt it to your needs easily. So, it comes as no surprise that the code depends on automatic serialization (reflection) which is not very efficient. Since we are going to talk about content loading on XNA / MonoGame this post apply to traditional GPU-skinning as well

Most of the CPU circles were wasted on serializing the list of Keyframes in AnimationClip. To resolve this we can write our own serializer. If you think this doesn't worth doing then take a look at the numbers below...

Platform Reader Loading Time
XNA automatic serialization 03,826 sec
custom AnimationClipReader 01,970 sec
MonoGame automatic serialization 14,263 sec
custom AnimationClipReader 07,284 sec

(Lumia 620). You can clearly see a drop by ~50% (Twice as Fast!).
The produced .xnb are also a bit smaller. 

he first step is to write a new ContentTypeWriter. Open the CpuSkinningPipelineExtensions project and add a new file named AnimationClipWriter.cs. Copy-paste the following code.


using CpuSkinningDataTypes;
using Microsoft.Xna.Framework.Content.Pipeline;
using Microsoft.Xna.Framework.Content.Pipeline.Serialization.Compiler;
using System;
using System.Collections.Generic;
 
namespace CpuSkinningPipelineExtensions
{
    /// <summary>
    /// Writes out a KeyframeContent object to an XNB file to be read in as
    /// a Keyframe.
    /// </summary>
    [ContentTypeWriter]
    class AnimationClipWriter : ContentTypeWriter<AnimationClip>
    {
        protected override void Write(ContentWriter output, AnimationClip value)
        {
            // write duration
            WriteDuration(output, value.Duration);
            WriteKeyframes(output, value.Keyframes);
        }
 
        private void WriteDuration(ContentWriter output, TimeSpan duration)
        {
            output.Write(duration.Ticks);
        }
 
        private void WriteKeyframes(ContentWriter output, IList<Keyframe> keyframes)
        {
            Int32 count = keyframes.Count;
            output.Write((Int32)count);
 
            for (int i = 0; i < count; i++)
            {
                Keyframe keyframe = keyframes[i];
                output.Write(keyframe.Bone);
                output.Write(keyframe.Time.Ticks);
                output.Write(keyframe.Transform);
            }
 
            return;
        }
 
        public override string GetRuntimeType(TargetPlatform targetPlatform)
        {
            return "CpuSkinningDataTypes.AnimationClip, CpuSkinningDataTypes";
        }
 
        public override string GetRuntimeReader(TargetPlatform targetPlatform)
        {
            return "CpuSkinningDataTypes.AnimationClipReader, CpuSkinningDataTypes";
        }
    }       
}


At this point you should rebuild the Content to get the new .XNB.

Next, Open the CpuSkinningDataTypes project and add a new file named AnimationClipReader.cs. Copy-paste the following code. 


using System.Collections.Generic;
using System.Collections.ObjectModel;
using Microsoft.Xna.Framework.Content;
using Microsoft.Xna.Framework.Graphics;
using Microsoft.Xna.Framework;
using System;
 
namespace CpuSkinningDataTypes
{
    /// <summary>
    /// A custom reader to read Keyframe.
    /// </summary>
    public class AnimationClipReader : ContentTypeReader<AnimationClip>
    {
        protected override AnimationClip Read(ContentReader input, AnimationClip existingInstance)
        {
            AnimationClip animationClip = existingInstance;
 
            if (existingInstance == null)           
            {
                TimeSpan duration = ReadDuration(input);
                List<Keyframe> keyframes = ReadKeyframes(input, null);
                animationClip = new AnimationClip(duration, keyframes);
            }
            else
            {
                animationClip.Duration = ReadDuration(input);
                ReadKeyframes(input, animationClip.Keyframes);
            }
            return animationClip;                       
        }
         
        private TimeSpan ReadDuration(ContentReader input)
        {
            return new TimeSpan(input.ReadInt64());
        }
 
        private List<Keyframe> ReadKeyframes(ContentReader input, List<Keyframe> existingInstance)
        {
            List<Keyframe> keyframes = existingInstance;
 
            int count = input.ReadInt32();
            if (keyframes == null)
                keyframes = new List<Keyframe>(count);
 
            for (int i = 0; i < count; i++)
            {
                Keyframe keyframe = new Keyframe();
                keyframe.Bone = input.ReadInt32();
                keyframe.Time = new TimeSpan(input.ReadInt64());
                keyframe.Transform = input.ReadMatrix();
                if (existingInstance == null)
                    keyframes.Add(keyframe);
                else
                    keyframes[i] = keyframe;
            }
            return keyframes;
        }
    }   
}


At this point you must make a few minor changes to AnimationClip & Keyframe classes.
Open AnimationClip.cs and change the access modifier of Duration to internal protected.

 public TimeSpan Duration { get; internal protected set; }


Now, open Keyframe.cs and replace all private modifiers to internal.

public class Keyframe
{
    //...
    public int Bone { get; internal set; }
    //...
    public TimeSpan Time { get; internal set; }
    //...
    public Matrix Transform { get; internal set; }
    //...
    internal Keyframe() {}
}
 

That's it!


If you want to know more about how content serialization works, 
see: XNA custom content writer/reader part 1: Introduction.

The .zip file below has some extra changes to correctly reload the model after Resuming under WP8/MonoGame. If you need these changes, make sure to copy both the CpuSkinnedModelWriter.cs CpuSkinnedModelReader.cs to your project and then rebuild your content.


Code

 CPUSkinning - 01 - Loader.zip (7.18 mb)


29. October 2012 03:06
by nKast
0 Comments

Motion API for XNA AR camera

29. October 2012 03:06 by nKast | 0 Comments

One of the coolest things you can do on mobile phones are Augmented reality apps. 
Combining the camera with the Motion API of windows phone is all you need. So, here's what you need to make AR on XNA.

First, Initialize the Motion API
Here I also set the update interval to 60FPS 

motion = new Motion();
motion.TimeBetweenUpdates = TimeSpan.FromMilliseconds(16.666);
motion.Start();
 

The important part is to align your XNA camera to the physical camera. For that we need the Attitude property from the motion API. In order to use it we must first apply some transformations. The last line is needed for landscape apps. Remove it If your app works in portrait mode. 

//corrent the rotation matrix from Motion api 
AttitudeReading attitude = motion.CurrentValue.Attitude;
Matrix orientation = Matrix.Identity;
orientation = Matrix.CreateRotationX(MathHelper.PiOver2); //device->screen cordinate
orientation *= attitude.RotationMatrix; 
orientation *= Matrix.CreateRotationZ(MathHelper.PiOver2); //portrait->landscape cordinate
 

What you have now is a View matrix. You can use it to draw your stuff with Model.Draw(...) or assign it to Effect.View. 
Sometimes this isn't enough. What I wanted was the actual orientation of the camera/phone as a 3D vector.
My first thought was to use Vector3.Transform(...) and transform a Vector3.Forward using the orientation matrix. That didn't work. Then I tried to get the orientation.Forward & orientation.Up but that didn't work either. Finally i wrote a small method that extracts the two vectors from a view matrix.
As you can see, you can use the results in order to create your own view matrix or use it in your Camera class.  

//extract oriantation from view matrixs
Vector3 cameraForward = Vector3.Zero;
Vector3 cameraUp = Vector3.Zero;
GetViewOrientation(ref orientation, out cameraForward, out cameraUp);
 
view = Matrix.CreateLookAt(cameraPosition, cameraPosition + cameraForward, cameraUp);
 

And here is the method to extracts the Fordward and Up vectors 

public void GetViewOrientation(ref Matrix view, out Vector3 forward, out Vector3 up)
{
    forward = new Vector3(-view.M13, -view.M23, -view.M33);
    up = new Vector3(view.M12, view.M22, view.M32);

}


MotionAPI XNA AR.zip (773.14 kb)

19. September 2010 11:52
by nKast
0 Comments

AccelKit, an Augmented Reality Accelerometer Kit for Windows Phone 7 Emulator

19. September 2010 11:52 by nKast | 0 Comments

AccelKit is an Augmented reality tool that simulates an accelerometer sensor for those who develop applications for the upcoming Windows Phone 7.
I used ARToolKit, an open source AR library that can track the position & orientation of a marker moving in front of a webcam.  Those data are then translated into accelerometer measurements and made available to any program through port 88. You can get the source code at accelkit.codeplex.com or just the executable at tainicom.


How to use it
 

Print the Print_This_Cutout.pdf on plain paper and glue it on a sheet of cardboard. 
Then cut out the phones. 

Place your webcam in  straight position, forming a 90o angle with the floor. 

Run the accelKit.exe found inside the Executable folder. 
On the first screen you are asked to select the desired web resolution. Because tracking can be very CPU intensive, select the lowest possible resolution (That screen might vary from webcam to webcam).
You should now see feed from your webcam. If not, check for other video capture devices in your system (like TV tuners for example) and disable them. 
Move the marker smoothly in front of the webcam. If accelKit keeps loosing track of the marker add some more light to the room to improve the image sharpness. If you still have problems, try again with the next resolution until you get consistent results. It is normal to lose track once in a while for a few frames, especial when the marker moves too fast or on extreme angles. 

Open a web browser and go to http://127.0.0.1:88/. You should see something in the form of "-0.068880,-0.997565,-0.010901". In case you are eager to see it in action get the samples at tainicom.net

Now, let's add support for accelKit in your applications. The code below (C#) demonstrates how you can get the accelKit data.

..
WebClient wc;
wc = new WebClient();
wc.AllowReadStreamBuffering = false;
wc.DownloadStringCompleted += new DownloadStringCompletedEventHandler(wc_DownloadStringCompleted);
wc.DownloadStringAsync(new Uri("http://127.0.0.1:88/"));
..

void wc_DownloadStringCompleted(object sender, DownloadStringCompletedEventArgs e)

if (e.Error != null) { timer.Begin(); return; }
if (e.Result == null) { timer.Begin(); return; }
string[] vc = e.Result.Split(new Char[] {',', ' '});
double x = Convert.ToDouble(vc[0]);
double y = Convert.ToDouble(vc[1]);
double z = Convert.ToDouble(vc[2]);

Inside the release you will find the AccelerometerEmu class that you can use as an in-place replacement of the Accelerometer class. Unfortunately, the Accelerometer is sealed so I couldn't inherit from it and had to use composition instead. AccelerometerEmu connects to the accelKit and retrieves data in a constant rate when run in the Windows Phone 7 emulator. When run in a real device, it uses the real Accelerometer (since I don't have access to a real device I couldn't test how good that works). Here's what you have to do:

Replace all instances of Microsoft.Devices.Sensors.Accelerometer with NKast.Sensors.AccelerometerEmu.

Add an event listener to ReadingEmuChanged.

..  
accelerometer.ReadingEmuChanged += new EventHandler<AccelerometerEmuReadingEventArgs>(accelerometer_ReadingEmuChanged);
..


void accelerometer_ReadingEmuChanged(object sender, NKast.Sensors.AccelerometerEmuReadingEventArgs e)  
{
Deployment.Current.Dispatcher.BeginInvoke(() => MyReadingChanged(e));
}


void MyReadingChanged(AccelerometerEmuReadingEventArgs e)
{
double accelx , accely , accelz;
accelx = e.X; 
accely = e.Y;
accelz = e.Z; 
..

My Plans for the next version

Bug fixes!
Code optimization.
Derive acceleration from the mark movement. Right now it only accounts for orientation, therefore you get only gravity acceleration as if you were rotating the device in a fixed position.
Add a mode where the webcam looks straight down. I understand that's necessary for certain types of games. 

Last notice

  • The simulated accelerometer fires events in fixed intervals. A real device might behave differently.
  • The Timestamp property of AccelerometerEmuReadingEventArgs is not yet emulated.
  • Currently it only returns the gravity acceleration. Not acceleration caused by movement.
  • Do not print the paper cutout on glossy or semigloss paper! The less glare, the better!


I hope you find it helpful while developing great games for Windows Phone 7 !